A thermal imaging camera is the closest thing this trade has to X-ray vision, and also the tool most often used to reach confident wrong conclusions. On most retrofit and ventilation jobs it is the tool that earns its place: it finds the slumped loft insulation, the cold bridge behind the dot-and-dab, the radiator running at half temperature because of sludge, and the gap where the cavity batts stop two courses short of the wall plate. Ten years ago that capability cost several thousand pounds. Today a genuinely useful camera plugs into your phone for a couple of hundred.
What separates the good ones from the junk is not the brand on the front. It is native infrared resolution, thermal sensitivity, and — more than either — whether the person holding it understands what a thermal image actually shows. A thermal camera measures surface temperature. It does not see moisture, it does not see through walls, and on a mild afternoon with the heating off it sees almost nothing at all. The kit list below reflects that: cameras that produce images you can defend, at prices that make sense for the work you do.
If you are chasing damp specifically, note now that thermal is only half the diagnosis — a cold patch is a suspicion, not a verdict. You confirm it with a damp meter. More on that below.
The one I’d buy

HIKMICRO Pocket2
A 256×192 native infrared sensor with sub-40mK sensitivity, an 8MP visual camera for image fusion, a proper touchscreen, and free reporting software — in a unit that fits a shirt pocket and costs about a third of the equivalent FLIR. On paper it is the best match for domestic survey work in this list, and the one I’d point to when someone asks what to buy without wanting a lecture.
Typically £400–£480
Check price on AmazonHow I judge a thermal camera
Native IR resolution first. The number that matters is the pixel count of the infrared sensor itself — 160×120 is the working minimum for survey imagery, 256×192 is comfortable. Manufacturers increasingly quote a “super resolution” figure produced by software upscaling; it makes the pictures prettier and tells you nothing new. Read the small print for the native figure before you buy anything.
Thermal sensitivity (NETD). Quoted in millikelvin: the smallest temperature difference the sensor can distinguish. Under 50mK and missing insulation shows up as a crisp shape; at 150mK the same defect is a vague smudge you will talk yourself out of. This is where cheap cameras quietly fail.
A visual camera for reports. A thermal image of a cold patch is meaningless in a report unless the reader can tell which wall they are looking at. Cameras that blend a normal photo with the thermal image — FLIR’s MSX, HIKMICRO’s fusion — earn their keep every time you write up a job.
Handling in real houses. Lofts, crawl spaces, the top of a stair with a torch in your teeth. One-handed operation, a screen you can read in a dark void, and a battery that lasts a working morning matter more than any laboratory spec.
What happens to the images afterwards. Radiometric files (where every pixel carries a temperature you can re-analyse later), sensible export, and reporting software that does not fight you. If the camera locks your data into a clumsy app, that is a running cost the price tag hides.
The comparison
| Model | Native IR resolution | Form | Typical price | Best for | |
|---|---|---|---|---|---|
| HIKMICRO Pocket2 | 256×192 | Pocket compact | ~£440 | Best overall for survey work | View |
| FLIR E5 Pro | 160×120 | Pistol-grip handheld | ~£1,200 | The professional option | View |
| FLIR C5 | 160×120 | Pocket compact | ~£500 | FLIR ecosystem in a pocket | View |
| HIKMICRO B20 | 256×192 | Pistol-grip handheld | ~£400 | Handheld feel on a working budget | View |
| TOPDON TC001 | 256×192 | Phone plug-in (USB-C) | ~£220 | Best on a budget | View |
| InfiRay P2 Pro | 256×192 | Phone plug-in (tiny) | ~£270 | Tight spaces and electrics | View |
| FLIR ONE Edge Pro | 160×120 | Wireless phone clip-on | ~£540 | Awkward angles, any phone | View |
| FLIR ONE Gen 3 | 80×60 | Phone plug-in | ~£200 | A first look, not survey work | View |
The picks in detail
HIKMICRO Pocket2
Best overall — the camera that covers domestic survey work without excuses
The top pick, as above, and worth the fuller case. The Pocket2 gives you a 256×192 native sensor — over twice the pixels of a FLIR C5 — with sensitivity better than 40mK, so slumped quilt insulation and cold bridging render as defined shapes rather than hints. The 8MP visual camera blends with the thermal image well enough that a client can recognise their own bedroom wall in the report, and the free Analyzer software handles radiometric re-analysis and report output without a subscription. It is small enough to live in the tool bag permanently — the spec nobody prints, because the best camera is the one actually with you when something looks odd above a loft hatch.
For
- 256×192 native IR with <40mK sensitivity — genuinely crisp images
- 8MP visual camera and fusion modes that make reports legible
- Free desktop reporting software, no subscription
- Pocket-sized, touchscreen, Wi-Fi image transfer
Against
- Not as drop-proof as a pistol-grip unit
- Touchscreen is fiddly with cold or gloved hands
Typically £400–£480
Check price on AmazonFLIR E5 Pro

The professional option — when clients and insurers expect the badge
The entry point to FLIR’s proper Ex-Pro handheld line, and the camera to buy if thermal imagery is a paid deliverable rather than a diagnostic aid. The resolution is a lower 160×120 native, but MSX edge enhancement makes those pixels unusually readable, the pistol-grip body shrugs off a two-metre drop onto a scaffold board, and the Ignite cloud workflow moves images from site to report with the least friction of anything here. You are paying roughly three Pocket2s for it; whether that is sensible depends entirely on who reads your output.
For
- Rugged, one-handed, built for daily site use
- MSX makes 160×120 punch above its pixel count
- Cloud workflow and reporting clients recognise
- The brand carries weight in disputes
Against
- Serious money for the native resolution on offer
- Bulkier than anything else in this list
Typically £1,100–£1,300
Check price on AmazonFLIR C5

Best for the FLIR ecosystem in a pocket
A flat, phone-shaped camera that does most of what the E5 Pro does at less than half the price. Same 160×120 sensor with MSX, same Ignite cloud upload, in a body that slips into a jacket pocket. Published user feedback is consistent that its images stand up fine in retrofit reports; the trade-off against the Pocket2 is fewer pixels for slightly more money, which is why HIKMICRO wins the top slot on hardware. Buy the C5 if you value FLIR’s software chain, or if the brand name on the report matters to your clients more than the sensor behind it.
For
- Genuinely pocketable with a decent touchscreen
- MSX and Ignite cloud — the polished FLIR workflow
- Radiometric JPEGs re-analysable in FLIR tools
Against
- 160×120 costs more here than 256×192 does elsewhere
- Battery is sealed — no swapping on a long day
Typically £450–£550
Check price on AmazonHIKMICRO B20

Best pistol-grip handheld on a working budget
The same excellent 256×192 sensor as the Pocket2 in a traditional pistol-grip body with a 2MP visual camera for fusion. If you spend whole days doing thermographic walk-rounds — blocks of flats, commercial units, heat-loss surveys before a retrofit design — the handheld format is less tiring and easier to aim steadily than a pocket slab, and the B20 delivers it for roughly HIKMICRO Pocket money. The visual camera is weaker than the Pocket2’s, so blended report images are less sharp. For occasional use the Pocket2 travels better; for volume work this is the more comfortable tool.
For
- 256×192 native and strong sensitivity at a fair price
- Pistol grip suits long survey days
- Wi-Fi transfer and the same free reporting software
Against
- 2MP visual camera makes fusion images soft
- Bulkier to carry “just in case” than a pocket unit
Typically £350–£430
Check price on AmazonTOPDON TC001

Best on a budget — a proper 256×192 sensor for phone-plug-in money
This is the one that changed the arithmetic. A 256×192 native sensor — the same class as cameras four times the price — on a USB-C dongle that draws power from your Android phone. Image quality, going by published sample images and user reviews, is honestly good — users show it resolving joist lines through a plasterboard ceiling more clearly than dedicated cameras from a few years ago managed. The compromises are the phone-dongle ones — it occupies your phone, it drains its battery, the app is functional rather than pleasant, and there is no onboard screen to glance at one-handed on a ladder. As a first thermal camera, or a backup that lives in the glovebox of the van, it is very hard to argue with. iPhone users should look at the TC002 variant or the P2 Pro below.
For
- 256×192 native IR for around £220
- Nothing to charge — runs off the phone
- Small enough to carry always
Against
- Ties up your phone and its battery
- App and export workflow are basic
- Fixed dongle is awkward at odd angles
Typically £180–£250
Check price on AmazonInfiRay P2 Pro

Best for tight spaces — nine grams, with a macro lens for consumer units
The smallest serious thermal camera made: a 256×192 sensor in a nine-gram module that disappears into a pocket, plus a clever magnetic macro lens that focuses close enough to read individual breaker terminals in a consumer unit. For electricians it is close to the obvious choice; for surveyors it earns a place as the camera that fits where a handheld will not — between joists, behind a cylinder, into a boxed-in soil stack. The buying admin is worse than it should be: separate USB-C and Lightning versions, so check the listing matches your phone before ordering.
For
- 256×192 in an absurdly small package
- Macro lens is genuinely useful on electrics
- Good sensitivity for the money
Against
- Separate iOS/Android versions — easy to buy the wrong one
- Easy to lose; treat it like a memory card, not a tool
Typically £250–£300
Check price on AmazonFLIR ONE Edge Pro
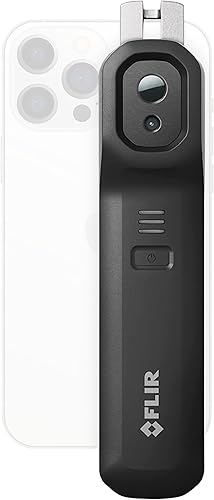
Best for awkward angles — a wireless camera you can hold above a loft hatch
FLIR’s cleverest phone accessory: the camera clips onto the phone in normal use, but detaches and connects wirelessly, so you can post the camera up through a loft hatch or behind a kitchen kickboard while watching the live image on the phone in your other hand. It works with both iOS and Android, which ends the dongle-connector lottery, and you get MSX and the FLIR app ecosystem. Against that: 160×120 native, a price within sight of the C5 and above the Pocket2, and one more battery to remember to charge. A specialist tool that is brilliant on the days you need exactly this trick.
For
- Detachable wireless camera — unique for inaccessible spots
- One unit covers iPhone and Android
- MSX edge detail on a phone workflow
Against
- 160×120 native at a 256×192 handheld price
- Another battery and pairing step in the routine
Typically £500–£570
Check price on AmazonFLIR ONE Gen 3
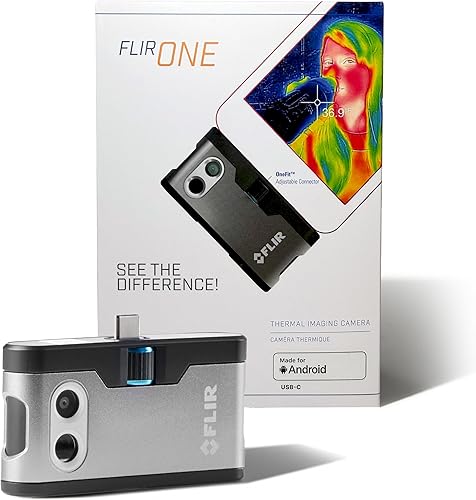
The entry point — fine for curiosity, below the bar for survey work
Included because people ask about it constantly: it is the cheap FLIR, it looks the part, and MSX makes its images deceptively handsome. But the native sensor is 80×60 — 4,800 pixels doing the work the marketing photos imply. That is enough to find a missing patch of loft insulation or a leaking radiator valve in your own home, and I would not use it to underwrite a paid opinion about anyone else’s. If your budget genuinely stops at £200, the TOPDON TC001 gives you ten times the infrared pixels for the same money and is the better buy. The Gen 3 is here so you know what you would be getting — and what you would not.
For
- Cheapest route to the FLIR app and MSX
- Perfectly adequate for homeowner curiosity
Against
- 80×60 native — below the working minimum for surveys
- Own battery to charge, and it is not generous
- Outclassed on hardware by cheaper rivals
Typically £180–£230
Check price on AmazonWhat actually matters — and what doesn’t
Conditions beat kit, every time. A thermal camera shows temperature differences, so there have to be some. For building work you want a decent delta-T — roughly 10°C between inside and out, held for a few hours. In practice that means a cold morning with the heating on since before dawn, curtains open, sun not yet on the elevation you care about. The same £1,200 camera that maps every stud and cold bridge at 7am in January will show you a flat grey nothing on a mild May afternoon.
Emissivity will lie to you. Every surface radiates heat with a different efficiency, and the camera assumes one value for the whole scene. Shiny surfaces are the trap: bare metal, gloss paint, foil-faced insulation and glass all reflect the thermal scene around them, so a foil-backed board can read as freezing while doing its job perfectly, and the classic embarrassment is photographing a “cold spot” that turns out to be the reflection of the sky. Matt building surfaces — plaster, brick, masonry paint — behave well; anything that would show your face in it does not.
Thermal shows temperature, not moisture. Damp patches often show cold because evaporation cools the surface — but so do cold bridges, voids, draughts and yesterday’s condensation. The camera raises the question; a moisture meter answers it. On damp jobs I use thermal to map the extent and pattern of a cold anomaly, then confirm with a damp meter and, where it matters, a carbide test. Anyone diagnosing rising damp from a thermal image alone is guessing in colour.
What the salesmen push that you can ignore: “super resolution” upscaling figures (marketing megapixels — only the native sensor counts), temperature ranges up to 550°C (houses live between about −10 and 60°C), the number of colour palettes (you will use two), and megapixel counts on the visual camera dressed up to look like thermal specification. One salesman-favourite that genuinely matters and rarely gets mentioned: whether the files are radiometric, so you can adjust level, span and emissivity back at the desk instead of living with whatever the screen showed on site.
Questions I get asked
Can a thermal camera see damp? Not directly — no thermal camera measures moisture. What it sees is the temperature signature damp often creates: evaporative cooling on a wet wall, or the thermal mass of saturated masonry lagging behind the room. That makes it an excellent screening tool for finding where to investigate, especially over large areas, but a cold patch has several innocent explanations. Confirm with a moisture meter before anyone quotes for tanking.
What resolution thermal camera do I need? For building survey work, treat 160×120 native infrared pixels as the floor and 256×192 as the sensible target — at typical room distances that is the difference between seeing that a wall is cold and seeing the shape of why. Ignore any resolution figure qualified by “super”, “enhanced” or “up to”; that is software interpolation. For casual homeowner use, 80×60 will find gross defects, but it will not support conclusions you would put your name to.
Are phone thermal cameras any good? The current 256×192 plug-ins — TOPDON TC001, InfiRay P2 Pro — are genuinely good, with sensors that embarrass dedicated cameras from five years ago. The compromises are practical rather than optical: they occupy your phone, the apps are workmanlike, and a dongle sticking out of a USB port is clumsy in a loft. For a homeowner, or a surveyor’s backup, they are the value of the decade. For daily professional use, a dedicated unit with its own screen and reporting chain still earns its price. For a full comparison of this category on its own, including which connector fits which phone, see the dedicated phone thermal camera guide.
When is the best time to do a thermal survey? Early morning, in the heating season, with the house warmed overnight and before sun hits the walls — you want a steady 10°C or so between inside and out and no solar gain confusing the picture. Overcast beats bright, still beats windy (wind strips the tell-tale warm patches off an elevation), and dry beats wet. October to April is the realistic window in the South East; a thermal survey booked for a sunny June afternoon is a photography session, not a diagnosis.
Thermal imaging is a routine part of how the practice approaches PAS 2035 retrofit assessments and the heat-loss questions that sit behind EPC ratings — the camera finds the defects, the paperwork tells you what they cost. If you would like a survey done rather than a shopping list for one, get in touch. More field-kit guides live in the kit index.
Small print. This guide is general buying advice drawn from manufacturers’ specifications and published user feedback, viewed through survey-work experience — not hands-on product testing, and not a substitute for a survey; models and firmware change, so check the current specification before buying. Prices are indicative, move constantly and are checked at the time of writing; the linked page always shows the current price. As an Amazon Associate I earn from qualifying purchases.